ecto Post Window
This section is provided to give a quick overview of the features of ecto
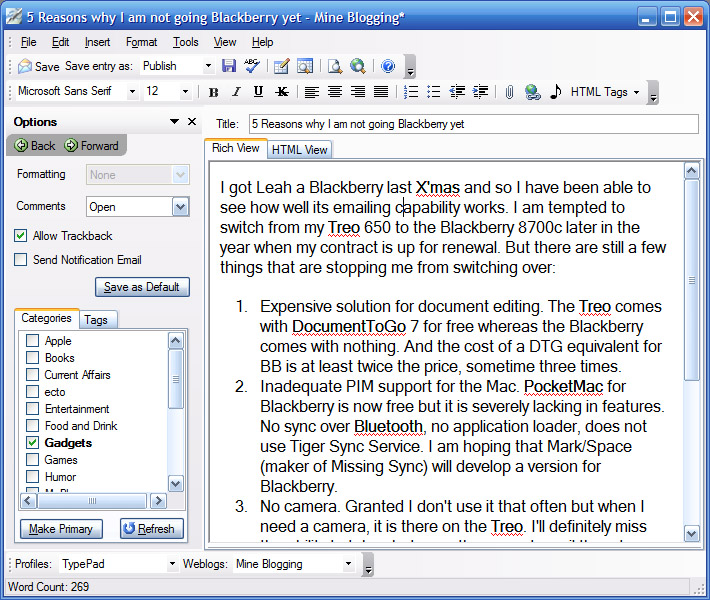
The post window is divided into three areas, the menu and tool bar at the top, the post options on the left and the post contents in the right half of the post window.
The Post Tool Bar
![]()
Save the current entry to server by clicking on the "Post Entry" button. The status of the post will be determined by the publishing option next to the button. Choose "Publish" if you wish the post to be published to your weblog immediately. Choose "Draft" if you wish to save the post in the weblog server but do not wish to publish the post yet.
Save the current entry as draft in ecto by clicking on the "Save as Draft" button.
Spellcheck the current entry by clicking on the "Spellcheck" button.
Display the Categories panel by clicking on the "Categories" button.
Display the Date/Time panel by clicking on the "Date/Time" button.
Preview the current post in the Preview window by clicking on the "Preview Entry" button.
Check your post in your weblog through your browser by clicking on the "View entry in Browser" button.
The Formatting Tool Bar
![]()
Make a word bold or italic by selecting a word in your post body or extended entry and clicking on the 'Bold' or 'Italic' button on either the 'Body' or 'Extended Body' text area.
Attach images or files to your entry by opening the Upload Files window through the "Upload Files..." button.
Create a link by clicking on the '<>' button and filling out the Link, Text, Title and Target fields. If text is selected when the link button is clicked, that text will already be filled in and linked when the process is complete.
Insert currently playing media in to the body or extended post by clicking on the 'Media' button in either the 'Basic' or 'Advanced' tab. Configure media insertion in the Settings window.
Use a custom HTML Tags by choosing the template from the 'HTML tags' dropdown menu. If text is selected, the tags will enclose the selected text.
![]()
The Profile and Weblogs Tool Bar

Choose which weblog to post your entry to by picking the profile from the 'Profiles' drop down list and then the 'Blogs' drop down list. The 'Profile' drop down list will not be available if there is only one profile setup in ecto. Similarly, the 'Blogs' drop down list will be unavailable if there is only one weblog in the selected profile.
Tip: To post the same entry to two (or more) weblogs without re-typing all the text, first create an entry and post it to the first weblog. Once that is completed by ecto, open this new post and pick a different weblog from the drop down list and post the entry again. ecto will now post the same entry to the second weblog as a new entry. Repeat this steps until you have posted the entry to all the weblogs you desired.
The Post Options panel

Post options

Set the ability to accept Comments for a post (if your weblog system supports Comments) by selecting from one of three options:
None
Open, or
Closed
Set the default text formatting of a post by selecting the option from the 'Default Text Formatting' drop down list. The default is set to 'None' since your weblog system may not support any text formatting filter. This will mean that you may have to enter HTML code manually for all the text in each post.
For example, MovableType and TypePad users will automatically has the option to use 'Convert Line Breaks' as the text formatting filter. This will automatically convert line breaks in the post content into HTML's paragraph code, thus saving you from manually inserting them.
Set the ability to accept Trackback for a post (if your weblog system supports Comments) by checking the 'Allow Trackback' checkbox.
Decide whether email notification should be sent for a post when it is posted to the server by checking 'Send Notification Email' checkbox.
Tip: The options above (Comments, Default Text Formatting, Allow Trackback, and Send Email Notification) can be remembered as the default options for all future post for this weblog by clicking on the 'Save as Default' button.
Changing post categories
Modify the categories for a post by opening a post to be edited and then clicking the 'Categories & Options' button. This opens the Post Options panel on the left with a list of categories for the selected weblog.

Click on the categories to set their 'on' or 'off' position. A primary category can be assigned via the "Make Primary" button. If no primary category is assinged, the first category in the list will become the primary category if that is an option set on your server.
Changing post tags
Modify the tags for a post by opening a post to be edited and then clicking the 'Categories & Options' button. This opens the Post Options panel on the left with a list of categories for the selected weblog. Select the "Tags" tab to display the list of tags created for the blog.

Click on the tags to set their 'on' or 'off' position. To add a new tag, click on the "+" button, while the "-" button will delete the currently selected tag from the list.
Changing post date/time
First displaying the Date/Time panel via the "Date/Time" button in the Post Tool Bar. Then modify the date in the 'Custom Publish Time' field. Some weblog services will not post your entry until it's publish date (if it's in the future).
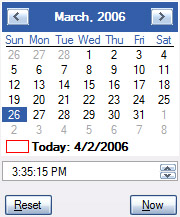
Reset to the current time by clicking on the "Now" button, or to the post's original time by clicking on the "Reset" button.
The Post Contents (Body/Extended Body)
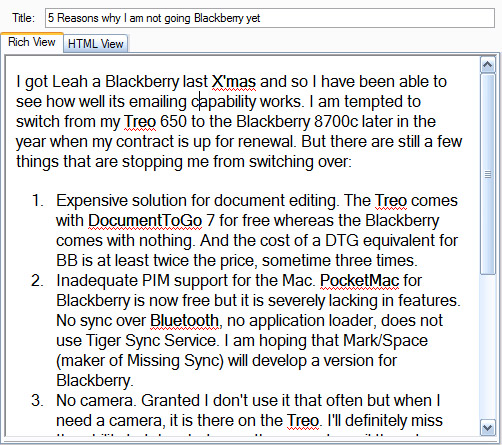
The Post Content area is where the text of an entry is entered. There are two tabs for text entrying, "Rich View" for WYSIWYG editing, and "HTML View" for editing raw HTML code. Each tab is divided into two text boxes, one for the main body of the post and the second one for the extended body of the post (if your weblog system supports extended post). For the majority of the users, the body text box is all you will need for creating and editing a post.
Tip: If you only use the body text box, you can 'hide' the extended body text box by clicking and hold down the mouse button on the divider between the two text boxes and drag the divider all the way to the bottom of the screen. This will 'hide' the extended body text box. If you need to use the extended body text box in the future, just position the mouse pointer near the bottom of the body text box until the cursor changes to a Up/Down arrow. Click and hold the mouse button and drag upward to reveal the extended body text box.
Remember to save your entry either as a draft or online after making any changes to the entry itself or the preferences that pertain to the entry. Not doing so may result in loss of data.